A simple and easy method
by Richard “Army” Maguire
Here is an easy method for shaping, curing and burning a pattern into rattan sticks. I have spoken to many practitioners of martial arts and read many items over the years regarding working with rattan. Here is a method that I presently use and a few tips I use to fashion sticks for our Balintawak club. This by no means is the only way to bend a stick straight or the only method to burn a pattern into the rattan you use. It however is the cleanest and safest way to date I have found.
I will explain all the materials to get you started and the many steps to the completed product. There really are not many sources on the internet explaining the actual curing process of rattan. By curing I mean removing the moisture inside the rattan to make it hard. Once hardened it will not warp or bend but remain straight. You want to straighten, taper or finish your sticks for practice then cure them. Whether your choice of rattan is with the skin or not the curing process will remain the same. For more durable sticks as both for heavy use in hitting or furniture making the skin is left intact. In our Balintawak club here in Los Angeles, California we prefer to practice with rattan without the harder skin attached. This is done for safety. The light-weight, tapered and skinned rattan is easier on practitioners if an accidental contact is made to the head or bony areas of the body. For tire hitting or more durable applications a stick with the skin on is more practical and will hold up better.
Here are the brief steps to working and fabricating your own sticks for your practice.
- 1. acquire rattan.
2. cut it to length
3. straighten
4. shape or taper (skip this if you are using rattan with the skin)
5. cure
6. burn pattern
7. sealing the wood optional
Rattan purchased from a martial arts vendor can be expensive. Buying rattan in bulk and following these steps will save you lots of money while you learn a new skill. If you are reading this article you most likely are a martial artist or Arnis teacher or student. You will want to share this information and possibly your finished sticks with fellow students and enthusiasts of the arts. Making your own sticks for practice can save you and fellow club members as much as 8-10 dollars per stick. Let’s get started.
First we need a supply of Rattan there are two trusted companies that I deal with here in Los Angeles. I will include contact information at the end of the article. Both companies will send Rattan anywhere in the United States. If you live outside the US do a web search or look in your local phone book under Cane repair or Cane , Rush or Rattan suppliers. Bamboo will do you no good.
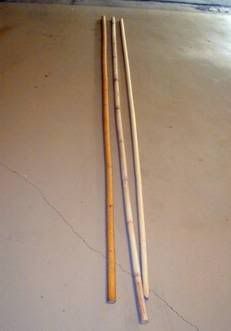
9 foot poles with and with out skin
You can buy Rattan pre-cut or in lengths as long as 9-12 feet. The easiest method to work with is to buy pre-cut rattan in 28 inch lengths either with or without skin. One-one and an eighth inch diameter is a common size. I suggest buying a variety of sizes for your first purchase to get familiar with the sizes and feel of different sticks in your hands.
This will give you a better idea of what to buy when ordering your poles or pre-cut sticks.
If you know the length of stick you want and diameter then move right into cutting the desired lengths once you get your stock.
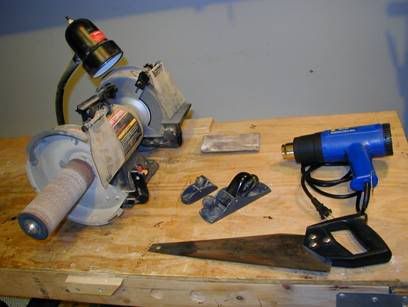
Above is a photo of the basic tools to assemble for cutting, shaping, bending and curing the rattan
I use a standard handsaw with fine teeth to cut rattan. Some people use an electric cross cut saw. Either method will do. First measure the desired length then cut. Often times I cut just an inch longer than the finished sticks will be. This gives me a little room to play with. It is easy to over taper the ends when first learning to use a wood plane. I can cut back a little if I taper the end of a stick to0 much.
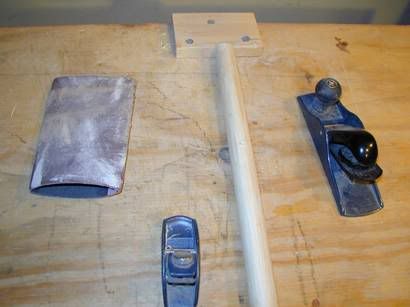
Two small hand planes and a little sheet of sand paper for shaping the rattan.
I use two small hand planes to shape the rattan. You can see them here in the above photo. The larger plane is set to take off a little more material .The smaller plane is for finishing and smoothing right before sanding. If you are going to leave the skin on your sticks then skip this part of the process and go right to heat curing.
I will share an easy way to trim a stick down to fit the hand the way you like and taper it. I must first mention there is a good reason why our club only practices with rattan that has been skinned. In a word SAFETY! We do not want to injure each other. If the rattan has the skin removed then it is lighter and has less density. This diminishes the force of impact. We do use larger and heavier sticks for strength and power practice or when tire hitting.
To remove the skin I lay the raw rattan on a flat bench and use the hand plane to remove the skin. I have two little tricks I use to keep the stick still so they are easier to plane. I have a block of wood attached to the top and rear of my bench.
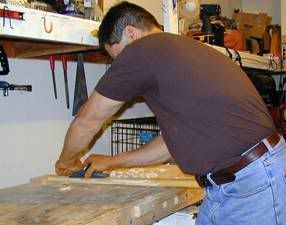
Taking off the skin with the hand plane
I rest one end of the rattan on that and push the plane in that direction. I also have a few small recessed holes in the front of the bench. They not only will hold one end of the stick but give me an easy guide as to how much I need to take off a stick.
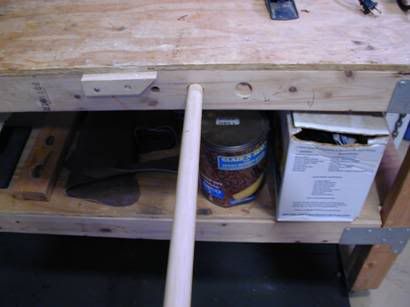
These recessed holes can be seen in the front portion of the bench in the above photo. I insert one end into the hole and hold the stick still with my body weight as I lean forward with the hip. I push the plane forward taking small bits of wood off till I get the desired shape. I examine the sticks many times to make sure the sticks are symmetrical and straight. If a stick has a slight curve when I start I ignore it. I can usually take that away as I remove material from the shaft of rattan. After getting the stick down to almost the proper size and taper I then finish it by sanding. Sanding can be done with sandpaper and by hand. I however do my sanding with a Flex Drum sander. Unlike a grinding wheel or other flat sanders this is a flexible shaft 8 inches long. Some are made of a spongy material or air filled and they conform to the wood when you apply pressure. This makes the job of sanding so easy and as well as fast.
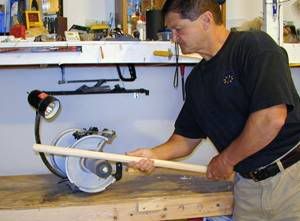
Sanding on the Flexible Drum Sander
If a stick is very bent then I may straighten it first before investing any more time in the shaping.
There are two methods I use for bending rattan. If the bend is not too severe I can often just heat the stick where the bent portion is.
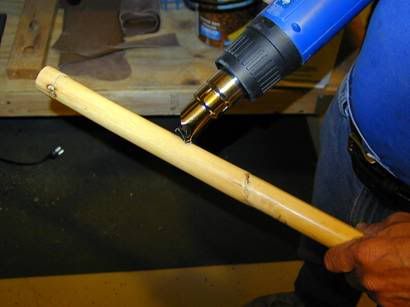
Heating the rattan with skin on to prepare it for straightening.
I run the heat gun up and down the bent area till it is very hot. This will usually make it pliable. I use a jig to straighten it. Another time that is suitable for straightening bends is right after they come out of the oven. You can place a number of rattan shafts in the oven to dry them out or cure them. We will discuss this further in the article. Usually just running the heat gun back and forth across the area you want straighten works very well.
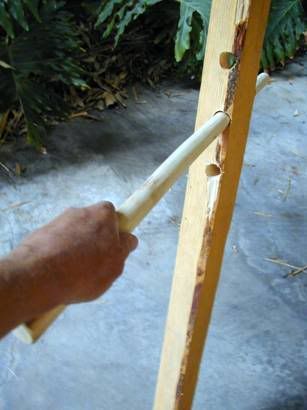
A home made jig used to straighten rattan.
Insert the end of the stick into the jig and bend it straight. Here is a photo of a home made jig. Drill varied size holes in a strong piece of lumber. The holes must be large enough to accommodate the stick easily. Smooth the corners of the Jig holes so they do not dent your rattan when being bent. This idea has been around for years it is used by the Australian whip makers when straightening rattan for whip stock handles.
Now that you have trimmed the skin off shaped and straightened your rattan it is time to cure it.
There are three methods that I know of and they all involve heat. Some guys lay rattan out in the hot sun for a week or more. This may or may not completely dry all the fibers in the rattan. If rattan is at all moist inside it may bend or warp over time. It also may eventually rot if it is too moist and lose its strength. Heat will dry the internal fibers out. Rattan is hollow all the way through. If you blow very hard on one end you will usually feel the air from the breath pass through the stick and out the other end. When you heat rattan it will cause steam to exit the ends of the sticks if the temperature is hot enough. Heat an oven to 350 degrees then place your sticks on the oven rack and let them dry inside. Leave them inside the closed oven for twenty minutes checking them after the first 10 minutes. When steam no longer comes out the ends of the sticks they are done. Use oven mitts or welders gloves to remove them. Be careful not to lay them on the counter or the kitchen floor. They may leave marks or burn those surfaces. Have a suitable container ready to place them in before removing them. This is often a good time to straighten any sticks that have yet to be straightened. I will hold them with Kevlar oven mitts and bend them straight at this point also. Traditional men used open fire to harden sticks for spears or clubs. I personally like to use the electric heat gun. It is safer and does not risk fire in the home. When I use my heat gun I usually take my work outside. I stay away from cars or flammable or combustible liquids and paints.
If drying the sticks makes them hard and durable then water has the opposite effect. If you want to bend a length of rattan into the shape of a cane with a crook then soak the rattan for twenty four (24) hours. Do not exceed the 24 hr time period for it may have an adverse effect and the rattan fibers may start to come apart. I have soaked rattan thoroughly in the bath tub and then bent it straight. Make sure you tie or bind it for a couple of days or longer to allow it to dry before releasing it or it may snap back to it original shape.
Experiment with throw away pieces you have cut from longer poles. I soak some extra pieces, burn some, dry some, etch patterns in others. This way I am always learning new techniques. Play around have fun and learn.
Regardless of how you dry your pieces of rattan make sure they are completely cured. This will ensure that they last and hold up better under a lot of impact during practice.
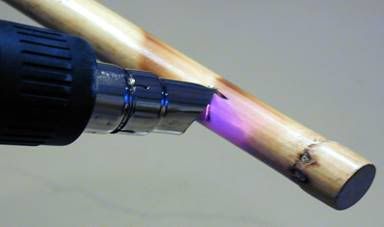
Heat gun is easy and safe to control for creating burn pattern.
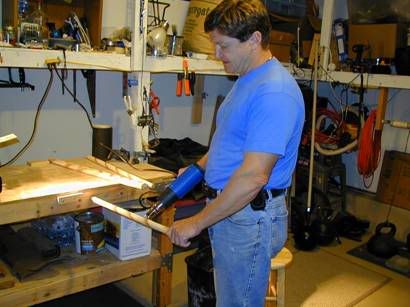
Heat Gun is Safer than an open flame to burn pattern into sticks.
I do not intricately decorate my sticks. I simply use the heat gun to spiral a pattern the length of the stick. These sticks are for working out they will eventually start to splinter and fray and come apart and will need to be replaced. This is why I do not spend much time in etching decorative dragons or burning intricate leopard spots into the wood.
Finally when I have gotten the shape, burned pattern and dried or cured my sticks. I sand down the edges on the ends with my flex drum sander. I want the ends rounded so if I come in contact with a training partner it will not tear or scrape the skin. Safety is our watch word. We are always courteous and safety conscious when it comes to our fellow Balintawak members. No need for heavy sticks or sharp stick butt ends when in practice.
Many people seal their sticks it helps hold the fibers together where they make contact with other sticks. Some guys do not like the feel of the varnish, shellac or wood sealer close to their hands. I personally like to leave the handle where the hands come in contact with the wood free of shellac or wood finish. I tape the handle area off and seal the rest of the stick. I like to use a water based product. This gives you the feel of the natural wood in the hand and still helps in protecting the wood fibers.
These directions are by no means the only way to treat or finish sticks. It is simply the way I have learned and developed over the years.
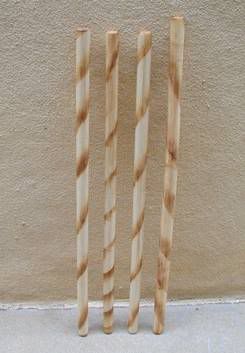
New sticks for the NNG Balintawak International Club
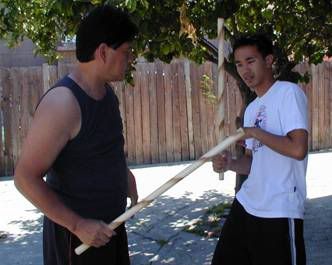
Grand Master Nene Gaabucayan and Francis Smith practice Pakgang.
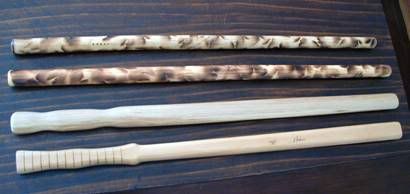
Here are some more examples of sticks I fashioned and burned with a special one of a kind pattern for Grand Master Nene. You may get as creative as you like. Here is also a pair of Garrotes that I made for Grand Master Nene.
There are some arnis players who inject epoxy fillers or other synthetic materials into the raw rattan with skin intact. This is done after the straightening, curing and a pattern has been burned into the sticks. This is no job to get into for the beginner. It is messy and requires alot more equipment. It makes the sticks heavier but also dense. What I have shared with you in this article is the method that uses the least money, time, effort and tools. You can start making your own sticks with the shape, weight and feel you like. These will cost you no more than a few dollars each and give you years of service. Please share this information with others be safe and most of all have fun.
Franks Cane and Rush Supply
7252 Heil Avenue
Huntington Beach, Ca. 92647
Phone: (714) 847-0707
Fax: (714) 843-5645
Email: mfrank@franksupply.com
Cane and Basket Supply Co.
1283 South Cochran Ave.
Los Angeles Ca. 90019
Phone (323) 939-9644
Email cbs@canbasket.com
You can contact Army care of his site: www.agelesstrength.com


4 comments:
My sincerest appreciation for Army's article submission. I am deeply honored to host it for him.
Army's a great guy, very good at what he does!
Great article!!! Thanks!
I made some sticks about 20 years ago and just bought some rattan from the Cane and Basket Supply Co. today. Do you have any suppliers that can get thin (maybe 1/2" or so) rattan that has a lot of nodes in it? A friend gave me a surprisingly dense one years ago and I've never seen anything like it since.
Hello Philip:
*bows deeply*
Yes, great article by Army!
Regarding suppliers - I don't, but I will check with Army. Perhaps other readers may know and post.
Thank you for your post!
Very truly yours in the MA and SD,
~sg
Post a Comment