Tuesday, October 31, 2017

Inktober Day #31: Craig Douglas' Pikal: Some points and stance


Today marks the last day of October and if you have been following along with me, that means it's also the last day of Inktober where artists draw a picture a day in October. I am not suggesting I'm an artist though. I used Inktober to practice my 'gesture drawing' skills as well as read/reread/research knifefighting. Why knifefighting? Learn how to use the knife in order to know how to defend against it.

Can you believe it? It seemed daunting at the onset, but lo and behold, here we are! For my Day #31 of Inktober picture, I'm focusing on Craig Douglas' Pikal expression.

Thank you all for your feedback and support as well as joining me in this project in my Sojourn of Septillion Steps!


In case you missed my other Inktober pictures on stance I've posted, please check out:


And in case you missed my other SouthNarc/Craig Douglas entries I've posted, please check out:


OK, now that the above 'housekeeping' is done ...

(Begin Big John McCarthy voice :-)

Are you ready?

LET'S GET IT ON!

(/voice)


From "An Expression of Pikal"
Craig Douglas aka "SouthNarc"
Pages 1-2


Points
  • "Pikal" - Visayan dialect; means "to rip"
  • "RGEI" - Reverse Grip Edge In... Edge facing body... thrust-heavy application
  • Angles are simply the common #1 and #2 strokes in Filipino Martial Arts regardless of whether it's a diagonal, horizontal, upwards or downwards
  • Objective:  Bull through adversary, thrusting like a sewing machine, rapid-fire and ballistic
  • Attributes that drive the system:
    • Footwork - allows one to close and hit
    • Power - drives blade and sink tip through flesh/clothing
    • Mechanics - hook and clear the interrupted thrust line

Stance
  • Weapon side forward
  • Point facing adversary
  • Unencumbered hand behind weapon
  • On balls of feet for quick zoning in and out of range
  • Keep everything compacted

Notes

  • Face obscured because at the time, SouthNarc was still an active duty undercover narcotics officer in the southern USA when he shared his expression of Pikal, hence, his nick of "SouthNarc"
  • Rear heel raised
  • RGEI - prior to Craig Douglas sharing his expression of Pikal, there were not many instructors publically teaching the RGEI... any time you look in a book or article prior to his teaching, anytime you saw reverse grip aka "icepick" - the edge was facing out and not INTO the body!
  • Humans are generally stronger pulling in than pushing out and with RGEI, a lot of damage can be caused on the pull-in
  • More on SouthNarc's Pikal in the near future.


My drawings for Inktober 2017 - drawing at least 1 pic each day in October:


Monday, October 30, 2017

Inktober Day #30 - Michael Janich's/MBC's Abanico


30th day of Inktober! After today, only 1 more day and picture left! What a project!

Today's picture is on the Abanico technique as taught by Michael Janich that is common in the Filipino Martial Arts. 

My previous drawings/notes on Michael Janich / Martial Blade Concepts in case you missed them: 


From "Knifefighting:  A Practical Course" (1993)
by Michael Janich, Pages 37-38


"Abanico"


Caption

"Abanico" is a quick combination of two cuts. First cut is a 'meet the force' (your attack meets his attack) and intercepts the incoming slash. Immediately after the first cut, put your safety check in place and rotate your hand to flow into a second cut in the opposite direction. Moves are tight and fast. Draw your edge through each cut.


Notes
  • "Abanico" is the Spanish word for "Fan"
  • Combination of inward slash and a backhand slash thrown in quick succession
  • After the knife cuts, quickly rotate wrist to palm down and cut in opposite direction with a backhand slash
  • Can reverse the order of cuts
  • Can progress to doing two abanicos

One more day/picture tomorrow!


My drawings for Inktober 2017 - drawing at least 1 pic each day in October:


Sunday, October 29, 2017

Inktober Day# 29 - Hank Reinhardt - Old fencing trick


2 days left to October and that means 2 pictures left for Inktober! Can you dig it?

Flipping through Hank Reinhardt's book, this caught my eye. Hope it helps in your MA and/or your defense.


From Hank Reinhardt's Book of Knives (2012)

There’s an old fencing trick that can be adapted here, as well. Since the lunge is made from the left foot, draw the left foot close to the right. Your opponent will judge your effective distance from your normal position, but when you lunge forward, your reach will be greater than he expects.

I once taught a judo and self-defense class at a YMCA that had a fencing team. One of the fencers was interested in knives, so we made some dummy knives to work out with after class. He was good at fencing and had won several matches in the Southeast. He moved beautifully and with frightening speed. When he lunged, he had about a 30 percent chance of landing a good hit. When he failed, however, he would have been crippled or killed.

Or else the right hand, holding the knife, can drive the point into your arm, causing you to slice your own forearm as you move forward.

Fencing lunges are always preceded by some fake or series of attacks designed to bring the opposing sword out of line so that the thrust can reach home. This isn’t possible with a knife, so the thrust and lunge have to be made as a single movement, with speed as the keynote for success. It just doesn’t work all the time. To sum all this up, I would advise you against lunging. You’re safer staying with cuts to the arm and leg until you can move in and finish your opponent off safely.


My drawings for Inktober 2017 - drawing at least 1 pic each day in October:


Saturday, October 28, 2017

Inktober Day #28 - Bloody Brazilian Knife Fighting Techniques' Immobilizing Targets


Day #28 of Inktober ... October and Inktober closing out soon. What a spectacular sojourn this has been for me! Following up on my previous Inktober pictures focusing on targeting, today's pic is from Uncle Fester's "Bloody Brazilian Knife Fighting Techniques".

If you missed my previous Inktober pictures on targeting, please check out:


Below are some of my notes. HTH!


P. 6
For those of us who have faced knife-wielding assailants, there is a defining moment, that split second in which you realize you are facing ghastly wounding or death and you MUST act and act decisively.


P. 12
Know your targets - A knife allows one to flee, negotiate, hurt or kill the opponent. In contrast to a handgun, one can have, almost literally, surgical precision with it. A skilful fighter must have a thorough knowledge of human anatomy to be able to achieve the expected effect with each attack.


P. 20
Injuries on tendons, muscles or nerves - stop any bleeding by direct pressure and immobilize the limb. Protect the open wound with clean sterile dressing. It will be necessary to seek surgical intervention in a proper medical environment.


P. 25
Attack types

Knives and many other objects can cut or perforate skin and contuse. Criminals use the most diverse way to cause violence. Attacks can be categorized as:

Immobilizing:

Characteristics - The goal is to incapacitate the opponent preserving its life.
Targets - Ligaments, muscles and tendons. Avoid main arteries.

  • Eyes (avoid deep thrusts, superficial cuts)
  • Shoulders - muscles and tendons
  • Arms - Biceps and Triceps
  • Forearms - Tendons
  • Hand - Tendons
  • Knees - Tendons, ligaments (front and back)
  • Feet - Tendons and ligaments (front and back)

As always, I hope this project as well as my blog helps in your Training!


My drawings for Inktober 2017 - drawing at least 1 pic each day in October:


Friday, October 27, 2017

Inktober Day #27 - Fernan Vargas'/Raven Combatives' Fairbairn Vital Template


Misnamed this Inktober Day #28 LOL

4 more days in October, 4 more drawings for Inktober! I am glad you were along for the ride!

Today's topic is a variation of targeting that I have focused on for the past 2 days known as a Vital Template.

If you missed my previous Inktober pictures on targeting, please check out:


Good luck in your training!


From Way of the Raven:  Blade Combatives Vol. One (2014)
By Fernan Vargas, Master at Arms
Page 143


THE FAIRBAIRN TEMPLATE

W.E. Fairbairn was arguably the most influential man in the history of WWII era combatives. Fairbairn's system of knife work was extremely simple and effective for the context in which it developed. One of my favorite Gems of information from the WWII era can be found in Fairbairn's book "Get Tough". In "Get Tough" Fairbairn includes a very small section on the use of the Smatchet, a large combat knife with a leaf shaped widely used thoughout the British military at the time. In this section Fairbairn demonstrates four techniques in sequence. For our purposes we have adopted the sequence as a vital template, paying special attention to the targets demonstrated by Fairbairn. The Fairbairn Sequence is as follows:


  1. Thrust to the abdomen.
  2. Backhand slash to the carotid artery
  3. Forehand slash to the carotid artery
  4. Pommel smash downwards into the face


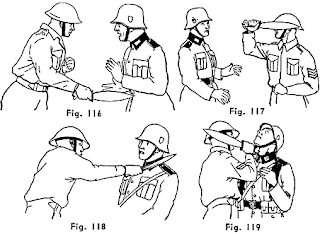
From Get Tough by William E. Fairbairn


Close-In Blows

  1. Drive well into the stomach (Fig. 116).
  2. "Sabre Cut" to right-low of neck (Fig. 117).
  3. Cut to left-low of neck (Fig. 118).
  4. Smash up with pommel, under chin (Fig. 119).
  5. Smash down with pommel into the face (Fig. 120).

Fernan Vargas' Fairbairn Vital Template is a little different than the sequence depicted in Get Tough which is very cool! An example of the classic Bruce Lee/Jeet Kune Do quote in action!

"Absorb what is useful, reject what is useless, add what is specifically your own."

I'm guessing that the sequence flowed better by dropping one strike, the smash up with pommel under the chin. Play with it, make it your own! Only you know how your body moves and what flows well and what doesn't. My understanding of Vital Templates in general is to emphasize Flow like water looking for an empty space to fill. Flowing between the targets and if met with obstruction, flow to the next target in the template.

Just Flow!

Source pictures from Get Tough below found off the Internet.


And my edit of the Fairbairn Vital Template as one picture.

I took the liberty to make a picture of the Fairbairn Vital Template from source pictures from Get Tough.


As always, I hope this helps in your Training!


My drawings for Inktober 2017 - drawing at least 1 pic each day in October:


Thursday, October 26, 2017

Inktober Day #26 - Amante Marinas'/Pananandata's 12 Targets


Day #26 of "Inktober"! 5 more days! Can you believe it?

Here's another drawing related to knifefighting as well as my notes below. Today I'm continuing on targeting. In case you missed my previous posts on targeting:


Below is my transcription as well as some comments.


From "Pananandata Knife Fighting" (1986)
By Amante P. Marinas Sr.
Pages 5-11


The Twelve Tagas

The eighteen basic attacks of pananandata may be grouped twelve at a time. The possibility of the repetition of an attack within the group of twelve movements will result in numerous combinations. By algebraic methods, the exact number of 12-taga abakadas (forms) may be determined. Though not directly applicable to combat, the twelve tagas , practiced diligently, will lend instinctive skill to the free fighter.

The twelve tagas have for their targets parts of the body from the groin to the top of the head. The twelve tagas consist of nine cutting actions and three thrusts. Two of the thrusts may also be delivered like cuts. Of the cuts, six are executed horizontally; two diagonally; and one vertically. Five of the attacks originate from the right, five from the left, and two from the center. The cuts, thrusts, and their targets are:

  1. Tabas talahib: Temple - RFH (right forehand) slash to temple, palm up
  2. Tagang alanganin: Jaw - RBH (right backhand) slash to jaw, palm down
  3. Tabas talahib: Biceps - RFH slash to biceps, palm up
  4. Tagang alanganin: Elbow - RBH slash to elbow, palm down
  5. Saksak sa sikmura: Solar plexus - Right thrust to solar plexus
  6. Aldabis sa ilalim: Groin - RBH slash to groin - palm down
  7. Saksak sa kanan: Chest - RFH thrust to chest - palm down
  8. Tagang buhat araw: Top of head - Right vertical slash down to head
  9. Tabas talahib: Neck - RFH slash to neck - palm up
  10. Tagang alanganin: Neck - RBH slash to neck - palm down
  11. Tagang San Miguel: Side of head - RFH slash to side of head - palm up
  12. Sungkit sa kaliwa: Side of face - RBH thrust to side of face - palm up

Note: Any mistakes in transcription/interpretation are mine.


My drawings for Inktober 2017 - drawing at least 1 pic each day in October:


Wednesday, October 25, 2017

Inktober Day #25 - John Styers' Targets


Day 25 of Inktober... day 25 of drawing a picture a day in the month of October. Staying with John Styers from the past 2 days, today's focus is on his targeting.

In case you missed my previous pictures on Targeting as well as my previous Styers' and related posts:


Below are my notes and comments. HTH!


From John Styers' "Cold Steel" (1952)
Page 67


TARGETS

After the fight you'll probably want to wipe off your blade. But if you don't hit anything you won't have to clean it; as a matter of fact, if you don't hit anything, your opponent probably will and what he hits will be PART OF YOU.

LOOK for targets on HIM, and let them feel your steel. IN A KNIFE DUEL, ANY TARGET IS A GOOD ONE TO BEGIN. THE KILL, HOWEVER, IS THE ULTIMATE.

Here are your targets:

  1. The hand that holds his blade.
  2. The heart which pumps his blood.
  3. The throat which contains his windpipe and blood supply to and from his head.
  4. His chest area which contains his lungs, heart, diaphragm and various other things he'd rather not have punctured.
  5. His back, below the shoulder blades. Thrust the knife INBOARD, toward the center of his body. Work your knife handle back and forth; this will do far more damage than a single thrust. In any portion of the back, chest, stomach or throat area PUMP THE HANDLE OF YOUR KNIFE.

Comments

Sometimes in Life one has a specific goal in mind, a target if you will. And if the target is obstructed, and won't be easy to achieve/access, then what does one do? Keep going for for the target? If you have your mind set on putting the square peg in the square hole, but you keep finding a circular hole, do you keep trying to force the square peg in?

Do not fixate on a target. Learn to flow. Look for the opening to your target but if obstructed, flow, take the target given to you! As Styers says above, "In a knife duel, any target is a good one..." Earlier this month, I attended a Terry Trahan knifefighting seminar. On targeting, he taught something to the effect of  go for the large targets.

Recall the Kelly McCann quote (writing as Jim Glover, in Guns & Ammo, May 1995):

"Any time sharpened steel meets flesh, flesh loses. Once the fury of flashing steel begins, it is almost impossible to stop without sustaining injury. That is the reality of a knife attack. That is what makes a knife so dangerous to fight against."


My drawings for Inktober 2017 - drawing at least 1 pic each day in October:


Tuesday, October 24, 2017

Inktober Day #24 - John Styers' Passata Sotto


WOW! Cannot believe I have been fairly consistent (outside of 2 days) in this Inktober project of drawing a picture a day. A week left!!

For today's topic in my knifefighting research, I'm revisiting the Close Combat classic, John Styers' "Cold Steel", specifically the Passata Sottto (I noticed too late my typo on 'Passato' in my picture).

In case you missed my previous Styers' posts and a related post:


As always, I hope this post, this project, as well as this site helps you in your Sojourn of Septillion Steps!


From John Styers' "Cold Steel" (1952)
Pages 68-70


Captions

  1. For an enemy attack, feint a low attack; draw his weapon low.
  2. When the opponent lowers his blade, attack his hand or wrist. (undrawn)
  3. Whip the blade up for a thrusting cut to your opponent's head.
  4. Attempt a straight thrust for your opponent's head or throat. (undrawn)

Notes


PASSATA SOTTO

Another means of getting your blade into your opponent, other than the direct manner from the guard position, is to perform a passata sotto in which you merely BEND THE TORSO VERY LOW and to the LEFT from the guard position. Thrust directly into the LOWER RIGHT CHEST or ABDOMINAL AREA of your opponent. This is a fine attack against an opponent who raises his right arm high in his attack, or otherwise exposes his lower right side. In some instances a left step may accompany the attack. This movement is also excellent for FAKING a low cut, drawing your opponent's blade low, whereupon you strike for his HAND, FOREARM or HEAD. If he refuses to be drawn low, you may safely risk an attack on his KNEE CAP.

Styers' Passatta Sotto is the Yang to the Yin of Bob Kasper's "Passata Sotto".

One concept, many techniques. Anytime you learn a technique, think broadly my Friends.

  • If you can feint low, you can feint high.
  • If you can attack high, you can attack low.
  • If you can feint low and attack high, then you can feint high and attack low.

Analyze and research the underlying concept of what makes the technique work. Play/explore the variables/factors. This is the Art of Learning!

One concept, many techniques.


My drawings for Inktober 2017 - drawing at least 1 pic each day in October:


Monday, October 23, 2017

Inktober Day #23 - John Styers' In-Quartata (or Out-of-Line)


Day 23 of Inktober ... continuing my research into knifefighting. Today's focus is on John Styers's In-Quartata. In case you missed my previous entries on John Styers, please check out:


Below is my transcription straight from the Close Combat Classic, Cold Steel.


From Cold Steel (1952)
By John Styers
Pages 56-60


  1. The in-quartata or out-of-line starts from the guard position. Conceal the nature of your attack until opponent is in range.
  2. When opponent rushes into range, thrust home and apply power with the rear leg, directing the body to the right side.
  3. Your rear leg will push off and swing to the right, pivoting the body out of line with the oncoming rush of your opponent.
  4. The full pivot out of line, with your rear foot solidly planted. Retain your full thrust, letting the opponent cut the blade out. If you attack an enemy from the rear or flank, try a straight thrust to the throat with the full edge, not the point, of your blade. Immediately draw the knife back, snapping the cutting edge of the knife across opponent's throat, making two cuts.

IN-QUARTATA OR OUT-OF-LINE

The defensive movement in fencing known as in-quartata or OUT-OF-LINE is a fine movement of the feet which throws the body approximately three feet out of the line of your opponent's attack if he attacks with so much force that you do not choose to be there to meet it with a stop thrust.

From your guard position, knees slightly bent, you execute a full thrust as the torso vigorously pivots, assisted by the free arm whipping back.

You will also utilize the FULL POWER of your REAR leg to pivot the whole body on the FORWARD leg. Your rear leg swings around in an arc and lands on the opposite side. Your entire stance should now look like a full sabre thrust from a sabre stance, but YOU ARE AT AN ANGLE TO YOLR OPPONENT.

Your opponent's momentum will carry him over your original position, by about two or three feet. There will be no need for you to withdraw your blade from your opponent, his momentum will carry his BODY OUT OF THE BLADE!


My drawings for Inktober 2017 - drawing at least 1 pic each day in October:


Sunday, October 22, 2017

Inktober Day #22 - Lee Morrison's/UC's The 3 Es


Counting down until the end of October ... 9 days left until end of Inktober.

Today's picture/drawing is on the anti-knife ROE (rules of engagement) taught by Lee Morrison of Urban Combatives.

If you missed my other posts on Lee Morrison, please check out:


My transcription of the caption as well as some notes below.


From "The Complete Book of Urban Combatives" (2015)
By Lee Morrison
Chapter 14: Counterweapons Training
Pages 145-146


Background
  • Peter Robins and Paul Child formulated the STAB (Strategic Tactics Against Blade) course taught in CODA (Combative Oriental and Defendu Arts).
  • CODA founded in 1993.
  • Lee Morrison credits STAB for most of the knifefighting and counterweapons training he teaches in UC (Urban Combatives).

The Three Es: Escape, Equalize, Eliminate
  1. First choice: If you have the option to Escape, do so.
  2. Second option: Equalize the threat - pick up anything close to use to even the odds ... hit, throw or shield with the equalizer.
  3. Third choice: Eliminate threat - shift into do-or-die mindset. My drawing doesn't include "Eliminate" - that may be a future drawing/picture, but basically you do what you have trained in for the third "E".

Learn to recognize these Pre-Assault Cues! Dan Inosanto teaches as his anti-knife ROE (Rules of Engagement):

  1. Run!
  2. Throw things!
  3. Use things!
  4. Martial Arts -- and expect to get cut.
IMO, STAB's The Three Es is an easy concise way to remember Dan Inosanto's anti-knife ROE. You now have a set of ROE to work under. Now you know, and knowing is half the battle!!

Be aware and stay safe my Friends!


My drawings for Inktober 2017 - drawing at least 1 pic each day in October:


Saturday, October 21, 2017

Inktober Day #21 - Lee Morrison's/Urban Combatives' Body Language Cues


10 days left until the end of October! That means the end of Inktober also! Thank you for joining me in my Sojourn of Septillion Steps for this project of combining drawings for Inktober and researching martial arts/self-defense. Early in my Inktober drawings I had no focus/theme. Then I was going to attend a Terry Trahan knifefighting seminar and I had an "Ah ha!" moment. Since then, I've been drawing pictures related to knifefighting.

Continuing my research/studies of "tells"/"PINs" (Pre-INcident indicators) today with a picture of some common body language cues taught by Lee Morrison of Urban Combatives.

If you missed my other posts on Pre-Assault Cues with regard to knifefighting, please check out:


Alrighty, here we go!


From "The Complete Book of Urban Combatives" (2015)
By Lee Morrison
Chapter 14:  Counterweapons Training
Pages 142-144

  • Always assume aggressor is armed and scan his hands. Can you see both hands and all fingers?
  • Approached by aggressor with distracting dialogue
  • Adrenal reactions tells:
    • erratic eye movement,
    • pale face,
    • wide-open eyes,
    • or trembling hand


Lee Morrison mentioned "distracting dialogue" above. One of the best writeups I've seen is from Geoff Thompson. He teaches it as"The Four D's" in Chapter 1 of his "Dead or Alive" book:

The Four 'D's

There are four techniques often used by attackers, especially muggers and rapists, in preparing victims for attack. Although these are nearly always overlooked by self-defence writers, the four 'D's – dialogue, deception, distraction and destruction – are the most important element of self-protection to be aware of.

DIALOGUE

Dialogue designed to disarm and distract the targeted victim is the professional attacker's most common priming technique. An attacker will approach a potential victim in a non-threatening way and begin a conversation. Often, he will ask a question about directions, ask if you have the time, a light, or any spare change. His objective is to make you think about his question, so that you do not notice the weapon he is drawing or his accomplice coming round behind you. It only takes a second of distraction for you to get into deep trouble. Understanding this will make you more aware and keep you alert, which is the most important part of target hardening.

DECEPTION

An attacker uses deception to make himself appear harmless. Dialogue and appearance are the most common methods used to deceive victims, to make them let down their guard. Do not expect dangerous people to stand out in a crowd.

Attacks may start with politeness, even with an ingratiating approach. Deception is the attacker's greatest asset. Every attack I have ever documented that was not a blind-side attack (the ones that happen when you do not use awareness) came through deception, the attacker using this as a window of opportunity.

DISTRACTION

Distraction is a part of deception and usually comes through dialogue. The attacker may ask his victim a question and then initiate attack while the victim is thinking about the answer. This distraction also switches off any instinctive, spontaneous physical response the victim may have. A man with twenty years of physical training in a fighting art can be stripped of his ability by this simple ploy. I have witnessed many trained fighters, who are monsters in the controlled arena, get beaten by a guy with only an ounce of their physical ability. How? They were distracted before the attack. Rob, a hardened street fighter and nightclub doorman, always told potential opponents that he didn't want to fight before he attacked them. Their first thought when recovering consciousness would be: 'I'm sure he said he didn't want to fight!'

If the distraction is submissive, 'I don't want any trouble, can we talk about it?' it will also take your assailant down from a state of fight or flight to one of low awareness, because your submissiveness tells him that the danger is over and he can relax into self-congratulation.

Brain engagement, via disarming/distracting dialogue, gives the victim a blind second. This is when the assailant strikes. The distraction is also used by the experienced attacker to take down any protective fences that may have been constructed by the victim (the 'fence' is dealt with in detail in a later chapter).

DESTRUCTION

This is the final product of expert priming. Few people survive the first physical blow and most are out of the game before they even realise that they are in it. Even trained martial artists often get suckered by the four 'D's because these do not appear on their training curriculum. They do not understand the enemy they are facing. The attacker uses the techniques of deception and distraction to prime a victim that is only trained in 'physical response'.


Learn to recognize these Pre-Assault Cues! Now you know, and knowing is half the battle!!

Stay safe my Friends!


My drawings for Inktober 2017 - drawing at least 1 pic each day in October:


ShareThis

 
back to top
Stickgrappler's Sojourn of Septillion Steps